Beberapa error dalam install joomla...

Sabtu, 12 Mei 2012

Beberapa kali kita sering mengalami error ketika menginstall joomla ( installer, komponen, modul ataupun template). Biasanya pesan yang muncul adalah :
JInstaller: :Install: Cannot find Joomla XML setup file
Berikut beberapa langkah yang perlu disesuaikan untuk mengatasinya :

  1. Setting php.ini diserver perlu disesuaikan diantaranya : memory_limit = 50M  post_max_size = 10M file_uploads = On upload_max_filesize = 10M  (Letak file php ini tergantung OS server anda masing-masing, di apache ubuntu letaknya di :  /etc/php5/apache2/php.ini
  2. Folder dalam joomla harus kita set Writeable agar saat menginstall berjalan baik. Folder tersebut adalah : tmp, modul, component, template, language.
  3. Jangan Lupa untuk merestart service apache untuk perubahan konfigurasi php.
Selamat berjuang ....

Cloning antar hardisk di linux tanpa bantuan software tambahan

Jumat, 04 Mei 2012


mungkin judul saya kurang tepat, maksud di sini adalah mengunakan software yg sudah include ada di linux jadi tidak perlu repot lagi mau install software atau bikin pakai software khusus.

sebenarnya lahngak ini sudah banyak di jelaskan di internet jadi tulisan ini saya tulis waktu pada saya kondisi kepepet di mana pada saat saya memaintenance warnet saya lupa membawa flashdisk 1 buah pun yg biasa saya gunakan flashdisk itu untuk software cloning saya yaitu clonezilla.
cara ini juga bisa di gunakan untuk menuliskan file .img ke flashdisk atau ke hardisk.
cara menulis file .img ke flash disk atau hardisk.
dd if=/lokasi_file_img/file.img of=/dev/hardisk_flashdisk
contoh:
dd if=/home/sa3o/pfsense.img of=/dev/sdb
kalau cara cloning :
dd if=/dev/hardisk_asal(bisa hardisk komp kita sendiri) of=/dev/hardisk_tujuan
contoh:
dd if=/dev/sda of=/dev/sdb
Sekian :D .

TIPS & TRIK : Webmin Tidak Mendeteksi isc-dhcp-server


Di ubuntu 12.04, webmin tidak mendeteksi adanya isc-dhcp-server. Untuk memperbaiki masalah ini, replace file  /etc/webmin/dhcpd/config dengan isi file sebagai berikut :


start_cmd=/etc/init.d/isc-dhcp-server start
lease_file=/var/lib/dhcp/dhcpd.leases
dhcpd_path=/usr/sbin/dhcpd
display_max=100
group_name=0
lease_tz=0
lease_sort=0
interfaces_type=debian
show_mac=0
stop_cmd=/etc/init.d/isc-dhcp-server stop
dhcpd_conf=/etc/dhcp/dhcpd.conf
pid_file=/var/run/dhcpd.pid
restart_cmd=/etc/init.d/isc-dhcp-server restart
desc_name=0
show_ip=0
dhcpd_nocols=5
add_file=
hostnet_list=
version=
dhcpd_version=4.1.1
dhcpd_size=700320
dhcpd_mtime=1279996769


Setelah isi file /etc/webmin/dhcpd/config Anda edit, refresh modul webmin, dan muncullah DHCP di modul Server.

source : klik

Menampilkan Google Maps di Joomla

Jumat, 27 April 2012

1. Pada Google Maps pilih lokasi yang dituju.
2. Klik icon Link / Tautan.
3. Pilih Source-nya saja untuk dipasang pada wrapper.


Disable Autoconfiguration IPv4 Address

Jumat, 09 Maret 2012


How to disable Autoconfiguration IPv4 Address

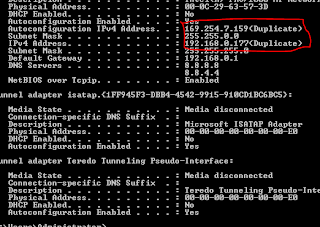
Sometime you setup windows server 2008 to vmware using LAN or wifi, you chose Bridge mode to share internet connections between host and virtual machine may be cause of issues with internet connection at virtual machine. They can not connect to the internet or appear a message likes "conflict IP address"

Enter: Run > cmd > ipconfig /all

You may see the following issues:


or:

Ethernet adapter Local Area Connection:

Connection-specific DNS Suffix . :
Description . . . . . . . . . . . : Intel(R) 82567LM-3 Gigabit Network Connection
Physical Address. . . . . . . . . : 00-23-24-08-30-57
DHCP Enabled. . . . . . . . . . . : No
Autoconfiguration Enabled . . . . : Yes
Link-local IPv6 Address . . . . . : fe80::8508:6cb9:5112:f8c9 (Preferred)
Autoconfiguration IPv4 Address. . : 169.254.248.201(Preferred)
Subnet Mask . . . . . . . . . . . : 255.255.0.0

IPv4 Address. . . . . . . . . . . : 192.168.1.136(Duplicate)
Subnet Mask . . . . . . . . . . . : 255.255.255.0
Default Gateway . . . . . . . . . : 192.168.1.1
DNS Servers . . . . . . . . . . . : 192.168.1.1
NetBIOS over Tcpip. . . . . . . . : Enabled

To fix it, enter these from Command Prompt:

C:\Users\lyngtinh> netsh interface ipv4 show inter

result as:

Idx Met MTU State Name
--- ---------- ---------- ------------ ---------------------------
1 50 4294967295 connected Loopback Pseudo-Interface 1
11 10 1500 connected Local Area Connection 

11: <=Keep it in mind

Next run this command:

C:\Users\lyngtinh>netsh interface ipv4 set interface 11 dadtransmits=0 store=persistent

Next, enter
Run > services.msc > disable DHCP Client service

Final, restart your server.

Good luck!
lyngtinh
Source : http://lyngtinh.blogspot.com

Setting ISC DHCP Server Ubuntu

Kamis, 01 Maret 2012


Rubah File /etc/default/isc-dhcp-server seperti kira-kira dibawah ini :
_______________________________________________
# Defaults for dhcp initscript
# sourced by /etc/init.d/dhcp
# installed at /etc/default/isc-dhcp-server by the maintainer scripts
# This is a POSIX shell fragment
# On what interfaces should the DHCP server (dhcpd) serve DHCP requests?
# Separate multiple interfaces with spaces, e.g. "eth0 eth1".
INTERFACES="eth0"
________________________________________________

Kemudian File di /etc/dhcp/dhcpd.conf sebagai berikut :
________________________________________________

#
# Sample configuration file for ISC dhcpd for Debian
#
ddns-update-style none;
log-facility local7;
# A slightly different configuration for an internal subnet.
subnet 192.168.100.0 netmask 255.255.255.0 {
  range 192.168.100.251 192.168.100.254;
  option domain-name-servers 192.168.100.6;
  option domain-name "sman1tumpang.sch.id";
  option routers 192.168.100.6;
  option broadcast-address 192.168.100.6;
  default-lease-time 600;
  max-lease-time 7200;
}
______________________________________________

Jalankan service daemonnya :
_________________________________

sudo /etc/init.d/isc-dhcp-server restart
_________________________________

Check dengan client Automatically DHCP......

WEBMIN : Installing on Debian

Sabtu, 11 Februari 2012


If you are using the DEB version of webmin, first download the file from the downloads page, or run the command :wget http://prdownloads.sourceforge.net/webadmin/webmin_1.580_all.debthen run the command :dpkg --install webmin_1.580_all.debThe install will be done automatically to /usr/share/webmin, the administration username set to root and the password to your current root password. You should now be able to login to Webmin at the URL http://localhost:10000/. Or if accessing it remotely, replace localhostwith your system's IP address.
If Debian complains about missing dependencies, you can install them with the command :apt-get install perl libnet-ssleay-perl openssl libauthen-pam-perl libpam-runtime libio-pty-perl apt-show-versions pythonIf you are installing on Ubuntu and the apt-get command reports that some of the packages cannot be found, edit /etc/apt/sources.list and make sure the lines ending with universe are not commented out.
Some Debian-based distributions (Ubuntu in particular) don't allow logins by the root user by default. However, the user created at system installation time can use sudo to switch to root. Webmin will allow any user who has this sudo capability to login with full root privileges.
If you want to connect from a remote server and your system has a firewall installed, see this page for instructions on how to open up port 10000.

Using the Webmin APT repository

If you like to install and update Webmin via APT, edit the /etc/apt/sources.list file on your system and add the lines :deb http://download.webmin.com/download/repository sarge contrib
deb http://webmin.mirror.somersettechsolutions.co.uk/repository sarge contrib
You should also fetch and install my GPG key with which the repository is signed, with the commands :cd /root
wget http://www.webmin.com/jcameron-key.asc
apt-key add jcameron-key.asc
You will now be able to install with the commands :apt-get update
apt-get install webmin
All dependencies should be resolved automatically.

Supported Debian-based Distributions

Webmin has been tested on all regular Debian releases, Ubuntu Linux, and derivatives like Xandros and APLINUX.

Source Packages

The files needed to build the Debian package are deb/webmin_1.580.dsc,deb/webmin_1.580.diff, and webmin-1.580.tar.gz .