Set / Change / Reset the MySQL root password on Ubuntu Linux

Sabtu, 11 Agustus 2012

Tested on
- Ubuntu Linux 7.10 Gutsy Gibbon and MySQL 5.0.45. (2007-10-21)
- Ubuntu Linux 6.06 Dapper Drake and MySQL 4.1.15.

Set / change / reset the MySQL root password on Ubuntu Linux. Enter the following lines in your terminal.

  1. Stop the MySQL Server.
    sudo /etc/init.d/mysql stop

  2. Start the mysqld configuration.
    sudo mysqld --skip-grant-tables &

  3. Login to MySQL as root.
    mysql -u root mysql

  4. Replace YOURNEWPASSWORD with your new password!
    UPDATE user SET Password=PASSWORD('YOURNEWPASSWORD') WHERE User='root'; FLUSH PRIVILEGES; exit;
Note: This method is not regarded as the securest way of resetting the password. However it works.


References

MySQL 5.0 Reference Manual: How to Reset the Root Password

How to reset your password in Ubuntu


There are many reasons you might want to reset a password:
Someone gave you a computer with Ubuntu installed on it but not the password for the user account.
You just installed Ubuntu and forgot what password you selected during the installation process.
You have too many passwords in your life and can't keep track of them all.
Well, this tutorial will help you reset your Ubuntu user account password, regardless of what reason you have for resetting it.
First, you have to reboot into recovery mode.
If you have a single-boot (Ubuntu is the only operating system on your computer), to get the boot menu to show, you have to hold down the Shift key during bootup.
If you have a dual-boot (Ubuntu is installed next to Windows, another Linux operating system, or Mac OS X; and you choose at boot time which operating system to boot into), the boot menu should appear without the need to hold down the Shift key.

From the boot menu, select recovery mode, which is usually the second boot option.

After you select recovery mode and wait for all the boot-up processes to finish, you'll be presented with a few options. In this case, you want the Drop to root shell prompt option so press the Down arrow to get to that option, and then press Enter to select it.

The root account is the ultimate administrator and can do anything to the Ubuntu installation (including erase it), so please be careful with what commands you enter in the root terminal.

In recent versions of Ubuntu, the filesystem is mounted as read-only, so you need to enter the follow command to get it to remount as read-write, which will allow you to make changes:

mount -o rw,remount /

If you have forgotten your username as well, type

ls /home
That's a lowercase L, by the way, not a capital i, in ls. You should then see a list of the users on your Ubuntu installation. In this case, I'm going to reset Susan Brownmiller's password.
To reset the password, type

passwd username
where username is the username you want to reset. In this case, I want to reset Susan's password, so I type
passwd susan
You'll then be prompted for a new password. When you type the password you will get no visual response acknowledging your typing. Your password is still being accepted. Just type the password and hit Enter when you're done. You'll be prompted to retype the password. Do so and hit Enter again.

Now the password should be reset. Type

exit
to return to the recovery menu.
 
After you get back to the recovery menu, select resume normal boot, and use Ubuntu as you normally would—only this time, you actually know the password!

Note:
Some people get freaked out about having recovery mode logging you in as root.

INSTALL OpenSSL DAN MEMBUAT SSLCertificate UNTUK MENGAKTIFKAN HTTPS DI APACHE2

Selasa, 07 Agustus 2012

Berikut tutorial dari Bang Opick Opensource Telkomspeedy :

Silahkan Di unduh di link berikut :  Tutorial openssl dan sslcertificate untuk https

Uninstall Apache dengan tuntas....

Terkadang kita membuat konfigurasi web server jadi komplek dan rumit, atau tidak sengaja tiba-tiba membuat setting yang mengakibatkan apache tidak berjalan normal. Untuk mengembalikan apache ikuti langkah uninstall dan install berikut ini.
Jalankan perintah :
        sudo apt-get --purge remove apache2.2-common

Perintah ini akan menghilangkan beberapa paket yang berhubungan :
apache2* apache2-mpm-prefork* apache2.2-common* libapache2-mod-php5* php5*

Dan Install lagi apache yang baru agar kembali ke setting awal :
         sudo apt-get install apache2 apache2-mpm-prefork apache2.2-common libapache2-mod-php5 php5

Web server bisa berjalan normal lagi.

Memisahkan Nama Depan dan Nama Belakang

Senin, 09 Juli 2012


Jika Anda bekerja dengan banyak data yang menggunakan nama orang, suatu saat Anda mungkin ingin memisahkan nama-nama tersebut menjadi dua bagian, yaitu nama dengan dan nama belakang. Dengan menggunkan rumus ini, pekerjaan tersebut sangat mudah dilakukan:


Pada kolom A terdapat nama lengkap, dan pada kolom B anda ingin mengambil nama depannya saja, sedang kolom C anda ingin mengambil nama belakangnya. Maka cukup tuliskan rumus:

=LEFT(A1;FIND(" ";$A$1:$A$16;1)-1)

  • LEFT(A1 artinya anda akan mengambil nama dari kolom A1 yang dimulai dari paling kiri.
  • FIND(" ";$A$1:$A$16;1)-1 akan mencari karakter spasi " ". Misal pada nama "Aan Arifin" karakter spasi ditemukan pada karakter ke-4, maka nilai yang dihasilkan adalah 4. Rumus -1 artinya angka 4 tadi dikurangi dengan -1 agar menjadi 3, sesuai dengan nama "Aan" yang hanya ada 3 karakter.

    =MID(A1;FIND(" ";$A$1:$A$16;1)+1;100)
    • =MID(A1; artinya anda akan mengambil nama dari kolom A1 yang dimulai dari tengah.
    • FIND(" ";$A$1:$A$16;1)+1, sama seperti rumus FIND di atas, untuk mencari karakter spasi " ", namun kali ini +1 untuk mencari nama belakang. Rumus FIND(" ";$A$1:$A$16;1)+1 akan menghasilkan angka 5, di mana nama "Arifin" dimulai dengan karakter ke-5. Rumus ;100) artinya karakter yang diambil untuk nama belakang diasumsikan 100 karakter.
    MEGA FORMULA
    sOURCE : http://formula-excel.blogspot.com/2010/06/memisahkan-nama-depan-dan-nama-belakang.html

    Memisah Nama Depan, Tengah dan Belakang dengan Fungsi Text


    Belajar fungsi-fungsi Excel, rasanya kurang lengkap jika tidak mendalami Text Functions. Beberapa Text Functions yang sudah dikenal luas adalah : LEFT, MID, RIGHT, FIND, UPPER, PROPER, LOWER. Hampir semua pengguna Excel sudah paham luar dalam tentang fungsi-fungsi tersebut. Beberapa fungsi text lain yang akan dibahas saat ini adalah: LEN, SUBSTITUTE, REPT, TRIM 

    A. LEN
    LEN berfungsi untuk menghitung jumlah karakter dari sebuah text . Contoh : LEN("Saya") menghasilkan 4

    B. SUBSTITUTE
    SUBSTITUTE berfungsi untuk menganti karakter tertentu dalam text dengan karakter lain. Contoh: =SUBSTITUTE("Saya","a","o",1) menghasilkan : "Soya". Ada 4 elemen dalam fungsi ini, yakni: 
    {TextOldTextNewText, [InstanceNumber]}
    Untuk elemen yang keempat atau InstanceNumber jika dikosongkan artinya semua karakter pada Oldtext yang akan diganti.
    Jadi rumus =SUBSTITUTE("Saya","a","o") akan menghasilkan "Soyo"
    Yang dimaksud InstanceNumber adalah, seperti pada contoh, huruf "a" yang ke berapa yang akan diganti.


    C. REPT
    REPT berfungsi untuk mengulang suatu karakter sebanyak n kali. Contoh : =REPT("a",2)menghasilkan "aa"


    D. TRIM
    Berfungsi untuk membuang kelebihan spasi pada sebuah text, di mana spasi di awal text akan dihapus, spasi di tengah text yang lebih dari 1 karakter akan dijadikan 1 karakter dan kelebihan spasi di akahir text akan dihapus. Contoh : 
    =TRIM("  Ana    Ahibbuka   ") menghasilkan "Ana Ahibbuka"


    Keempat fungsi di atas, tampaknya useless, artinya tidak berguna sama sekali jika hanya dilihat sekilas. Tapi jika digabung dengan  fungs-fungsi yang lain, maka akan tampak sekali kegunaannya.


    Berikut saya contohkan penggunaan fungsi-fungsi Text untuk mencari nama depan, nama tengah dan nama belakang.


    • Mencari Nama Depan
    Mencari nama depan dari sebuah nama bukanlah hal yang sulit. Cara kerjanya adalah dengan mencari posisi spasi, kemudian mengambil karakter sebelah kiri sebanyak posisi spasi dikurangi 1.
    Contoh Misal nama lengkap "Ahmad Ahmadi" ada di sel A1, maka rumusnya adalah:
    =LEFT(A1,FIND(" ",A1)-1)


    • Mencari Nama Belakang
    Tinngkat kesulitan mencari nama belakang agak berbeda dengan nama depan. karena nama orang kadang bisa lebih dari dua kata. Misal yang ingin dicari nama belakangnya adalah "Ahmad Nur Putro Bin Salam" ada di sel A1
    Langkah penyelesaiannya adalah mengambil karakter paling kanan (RIGHT) sejumlah posisi spasi terakhir. Masalah timbul karena jumlah spasi kan bisa jadi tidak sama. Maka kita harus putar otak untuk mencari jumlah spasi terlebih dahulu. Nah, di sinilah fungsi SUBSTITUTE menemukan tempatnya. Dengan SUBSTITUTE kita ganti semua spasi dengan kosong, kemudian Jumlah karakter awal dikurangi dengan jumlah karakter dari kata awal yang telah dibuang spasinya. Lengkapnya begini:

    1. Cari Jumlah karakter nama lengkap : =LEN(A1)
    2. Buang spasi  : SUBSTITUTE(A1," ","")
    3. Kurangi langkah 1 dengan langkah 2 : =LEN(A1)-LEN(SUBSTITUTE(A1," ","")
    4. Berikutnya kita mengganti spasi terakhir dengan karakter "*": SUBSTITUTE(A1," ","*",LEN(A1)-LEN(SUBSTITUTE(A1," ","")))
    5. Menemukan spasi terakhir: FInd("*",langkah4) 

    Langkah selanjutnya lebih mudah yakni tinggal mengambil karakter paling kanan sejumlah langkah no 5.
    =RIGHT(A1,LEN(A1)-FIND("*",SUBSTITUTE(A1," ","*",LEN(A1)-LEN(SUBSTITUTE(A1," ","")))))


    • Mencari Nama Tengah
    Mencari nama tengah adalah pekerjaan paling sulit dalam urusan memecah nama. Kalau logika yang digunakan untuk menyelesaikan kasus ini hanya biasa saja, maka dibutuhkan rumus yang panjang. Orang yang biasa bekerja dengan Excel dituntut untuk berpikir out of the box untuk mencari nama tengah ini dengan mudah. Biasanya kita (termasuk saya) dalam mencoba memecahkan kasus ini berpijak dari rumus mencari nama depan dan belakang di atas. Masalah yang timbul adalah bagaimana menentukan spasi yang akan dijadikan pedoman untuk mengambil nama tengah. Sehingga menurut saya, diperlukan otak yang sedikit miring untuk memacahkan kasus ini secara cerdas. 
    Perhatikan rumus yang saya dapat dari milis BelajarExcel berikut:
    =TRIM(MID(SUBSTITUTE(A1," ",REPT(" ",99)),99*INT((LEN(A1)-LEN(SUBSTITUTE(A1," ","")))/2),99))
    Formula ini sungguh-sungguh cerdik. Formula ini bekerja dengan mengganti semua spasi dengan spasi sebanyak 99, kemudian mengambil karakter di tengah dimulai dari karakter ke (99*(jumlah spasi /2)) sebanyak 99 karakter. Kemudian membuang kelebihan spasi dengan fungsi TRIM. Simple, Cerdik ...!!!!


    Well, demikian pembahasan fungsi Text, mudah-mudahan bermanfaat.
    File contoh bisa didownload di sini atau di Boxnet pada sidebar.

    Problem: Menu Drop Down tidak mau membuka

    Selasa, 19 Juni 2012

    Menu Drop Down tidak mau membuka pada moodle karena cache situs moodle anda belum dihapus, coba dengan cara ini :
    1. Hapus Cache Theme anda pada tautan http://yourdomain.com/theme/index.php
    Jika masih tidak bekerja maka hapus juga cache system anda
    2. Hapus cache pada system admin pada link http://yourdomain.com/admin/purgecaches.php
    Selamat mencoba, ok.

    error dengan pesan "JW_SIG_CFU"

    Senin, 14 Mei 2012

    I work with simple image gallery and work fine, but appear in the top of my site the message "JW_SIG_CFU" in background color orange.


    Solution :
    The problem is ok. Is about status of chmod in chache folder, change for 777 and the problem is ok.

    Beberapa error dalam install joomla...

    Sabtu, 12 Mei 2012

    Beberapa kali kita sering mengalami error ketika menginstall joomla ( installer, komponen, modul ataupun template). Biasanya pesan yang muncul adalah :
    JInstaller: :Install: Cannot find Joomla XML setup file
    Berikut beberapa langkah yang perlu disesuaikan untuk mengatasinya :

    1. Setting php.ini diserver perlu disesuaikan diantaranya : memory_limit = 50M  post_max_size = 10M file_uploads = On upload_max_filesize = 10M  (Letak file php ini tergantung OS server anda masing-masing, di apache ubuntu letaknya di :  /etc/php5/apache2/php.ini
    2. Folder dalam joomla harus kita set Writeable agar saat menginstall berjalan baik. Folder tersebut adalah : tmp, modul, component, template, language.
    3. Jangan Lupa untuk merestart service apache untuk perubahan konfigurasi php.
    Selamat berjuang ....

    Cloning antar hardisk di linux tanpa bantuan software tambahan

    Jumat, 04 Mei 2012


    mungkin judul saya kurang tepat, maksud di sini adalah mengunakan software yg sudah include ada di linux jadi tidak perlu repot lagi mau install software atau bikin pakai software khusus.

    sebenarnya lahngak ini sudah banyak di jelaskan di internet jadi tulisan ini saya tulis waktu pada saya kondisi kepepet di mana pada saat saya memaintenance warnet saya lupa membawa flashdisk 1 buah pun yg biasa saya gunakan flashdisk itu untuk software cloning saya yaitu clonezilla.
    cara ini juga bisa di gunakan untuk menuliskan file .img ke flashdisk atau ke hardisk.
    cara menulis file .img ke flash disk atau hardisk.
    dd if=/lokasi_file_img/file.img of=/dev/hardisk_flashdisk
    contoh:
    dd if=/home/sa3o/pfsense.img of=/dev/sdb
    kalau cara cloning :
    dd if=/dev/hardisk_asal(bisa hardisk komp kita sendiri) of=/dev/hardisk_tujuan
    contoh:
    dd if=/dev/sda of=/dev/sdb
    Sekian :D .

    TIPS & TRIK : Webmin Tidak Mendeteksi isc-dhcp-server


    Di ubuntu 12.04, webmin tidak mendeteksi adanya isc-dhcp-server. Untuk memperbaiki masalah ini, replace file  /etc/webmin/dhcpd/config dengan isi file sebagai berikut :


    start_cmd=/etc/init.d/isc-dhcp-server start
    lease_file=/var/lib/dhcp/dhcpd.leases
    dhcpd_path=/usr/sbin/dhcpd
    display_max=100
    group_name=0
    lease_tz=0
    lease_sort=0
    interfaces_type=debian
    show_mac=0
    stop_cmd=/etc/init.d/isc-dhcp-server stop
    dhcpd_conf=/etc/dhcp/dhcpd.conf
    pid_file=/var/run/dhcpd.pid
    restart_cmd=/etc/init.d/isc-dhcp-server restart
    desc_name=0
    show_ip=0
    dhcpd_nocols=5
    add_file=
    hostnet_list=
    version=
    dhcpd_version=4.1.1
    dhcpd_size=700320
    dhcpd_mtime=1279996769


    Setelah isi file /etc/webmin/dhcpd/config Anda edit, refresh modul webmin, dan muncullah DHCP di modul Server.

    source : klik

    Menampilkan Google Maps di Joomla

    Jumat, 27 April 2012

    1. Pada Google Maps pilih lokasi yang dituju.
    2. Klik icon Link / Tautan.
    3. Pilih Source-nya saja untuk dipasang pada wrapper.


    Disable Autoconfiguration IPv4 Address

    Jumat, 09 Maret 2012


    How to disable Autoconfiguration IPv4 Address

    Sometime you setup windows server 2008 to vmware using LAN or wifi, you chose Bridge mode to share internet connections between host and virtual machine may be cause of issues with internet connection at virtual machine. They can not connect to the internet or appear a message likes "conflict IP address"

    Enter: Run > cmd > ipconfig /all

    You may see the following issues:


    or:

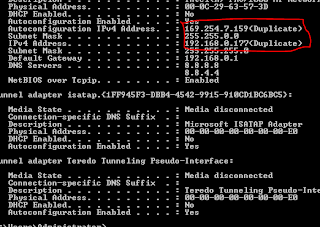
    Ethernet adapter Local Area Connection:

    Connection-specific DNS Suffix . :
    Description . . . . . . . . . . . : Intel(R) 82567LM-3 Gigabit Network Connection
    Physical Address. . . . . . . . . : 00-23-24-08-30-57
    DHCP Enabled. . . . . . . . . . . : No
    Autoconfiguration Enabled . . . . : Yes
    Link-local IPv6 Address . . . . . : fe80::8508:6cb9:5112:f8c9 (Preferred)
    Autoconfiguration IPv4 Address. . : 169.254.248.201(Preferred)
    Subnet Mask . . . . . . . . . . . : 255.255.0.0

    IPv4 Address. . . . . . . . . . . : 192.168.1.136(Duplicate)
    Subnet Mask . . . . . . . . . . . : 255.255.255.0
    Default Gateway . . . . . . . . . : 192.168.1.1
    DNS Servers . . . . . . . . . . . : 192.168.1.1
    NetBIOS over Tcpip. . . . . . . . : Enabled

    To fix it, enter these from Command Prompt:

    C:\Users\lyngtinh> netsh interface ipv4 show inter

    result as:

    Idx Met MTU State Name
    --- ---------- ---------- ------------ ---------------------------
    1 50 4294967295 connected Loopback Pseudo-Interface 1
    11 10 1500 connected Local Area Connection 

    11: <=Keep it in mind

    Next run this command:

    C:\Users\lyngtinh>netsh interface ipv4 set interface 11 dadtransmits=0 store=persistent

    Next, enter
    Run > services.msc > disable DHCP Client service

    Final, restart your server.

    Good luck!
    lyngtinh
    Source : http://lyngtinh.blogspot.com

    Setting ISC DHCP Server Ubuntu

    Kamis, 01 Maret 2012


    Rubah File /etc/default/isc-dhcp-server seperti kira-kira dibawah ini :
    _______________________________________________
    # Defaults for dhcp initscript
    # sourced by /etc/init.d/dhcp
    # installed at /etc/default/isc-dhcp-server by the maintainer scripts
    # This is a POSIX shell fragment
    # On what interfaces should the DHCP server (dhcpd) serve DHCP requests?
    # Separate multiple interfaces with spaces, e.g. "eth0 eth1".
    INTERFACES="eth0"
    ________________________________________________

    Kemudian File di /etc/dhcp/dhcpd.conf sebagai berikut :
    ________________________________________________

    #
    # Sample configuration file for ISC dhcpd for Debian
    #
    ddns-update-style none;
    log-facility local7;
    # A slightly different configuration for an internal subnet.
    subnet 192.168.100.0 netmask 255.255.255.0 {
      range 192.168.100.251 192.168.100.254;
      option domain-name-servers 192.168.100.6;
      option domain-name "sman1tumpang.sch.id";
      option routers 192.168.100.6;
      option broadcast-address 192.168.100.6;
      default-lease-time 600;
      max-lease-time 7200;
    }
    ______________________________________________

    Jalankan service daemonnya :
    _________________________________

    sudo /etc/init.d/isc-dhcp-server restart
    _________________________________

    Check dengan client Automatically DHCP......

    WEBMIN : Installing on Debian

    Sabtu, 11 Februari 2012


    If you are using the DEB version of webmin, first download the file from the downloads page, or run the command :wget http://prdownloads.sourceforge.net/webadmin/webmin_1.580_all.debthen run the command :dpkg --install webmin_1.580_all.debThe install will be done automatically to /usr/share/webmin, the administration username set to root and the password to your current root password. You should now be able to login to Webmin at the URL http://localhost:10000/. Or if accessing it remotely, replace localhostwith your system's IP address.
    If Debian complains about missing dependencies, you can install them with the command :apt-get install perl libnet-ssleay-perl openssl libauthen-pam-perl libpam-runtime libio-pty-perl apt-show-versions pythonIf you are installing on Ubuntu and the apt-get command reports that some of the packages cannot be found, edit /etc/apt/sources.list and make sure the lines ending with universe are not commented out.
    Some Debian-based distributions (Ubuntu in particular) don't allow logins by the root user by default. However, the user created at system installation time can use sudo to switch to root. Webmin will allow any user who has this sudo capability to login with full root privileges.
    If you want to connect from a remote server and your system has a firewall installed, see this page for instructions on how to open up port 10000.

    Using the Webmin APT repository

    If you like to install and update Webmin via APT, edit the /etc/apt/sources.list file on your system and add the lines :deb http://download.webmin.com/download/repository sarge contrib
    deb http://webmin.mirror.somersettechsolutions.co.uk/repository sarge contrib
    You should also fetch and install my GPG key with which the repository is signed, with the commands :cd /root
    wget http://www.webmin.com/jcameron-key.asc
    apt-key add jcameron-key.asc
    You will now be able to install with the commands :apt-get update
    apt-get install webmin
    All dependencies should be resolved automatically.

    Supported Debian-based Distributions

    Webmin has been tested on all regular Debian releases, Ubuntu Linux, and derivatives like Xandros and APLINUX.

    Source Packages

    The files needed to build the Debian package are deb/webmin_1.580.dsc,deb/webmin_1.580.diff, and webmin-1.580.tar.gz .

    Install webmin di ubuntu server

    Kamis, 09 Februari 2012


    Langsung aja gan pertama install paket berikut ini jika paket yang di butuhkan untuk menginstall web mint belum ke install
    sudo apt-get install perl libnet-ssleay-perl openssl libauthen-pam-perl libpam-runtime libio-pty-perl apt-show-versions python
    kemudian ada dua cara untuk menginstall webmint yang pertama download paket .deb yang bisa di download di seperti berikut ini
    wget http://prdownloads.sourceforge.net/webadmin/webmin-1.570_all.deb
    Kemudian lakukan perintah berikut ini untuk menginstall paket .deb tersebut dan jangan lupa paket yang du butuhkan sudah ke install:
    dpkg --install webmin_1.570_all.deb
    Kemudian cara kedua melalui repo sitory webmin sendiri cara nya seperti berikut ini.
    deb http://download.webmin.com/download/repository sarge contrib
    deb http://webmin.mirror.somersettechsolutions.co.uk/repository sarge contrib
    Tambahkan repo di atas si /etc/apt/sources.list Kemudian jangan lupa untuk key repo itu sendiri caranya seperti berikut
    wget http://www.webmin.com/jcameron-key.asc
    apt-key add jcameron-key.asc
    Kemudian lakukan perintah update dan install
    sudo apt-get update
    sudo apt-get install webmin
    Sekian.